
Wednesday, December 21, 2011


Sunday, December 18, 2011
Christmas gifts
Each year I put together a bag of goodies for each family that we see on Christmas Day. A bag of yummy homemade items, just because I want to, because I LOVE giving and because I love and appreciate my family so much. So over the next week I thought I would share some of the goodies I include. They are not expensive, just little treats I can make with my own hands to share and show love.

Today I have done a quick step by step for the calendars I include in each bag. This year I am using a quote on the calendar because, number 1. it's different (I usually use a recent family photo of their children or all of the nieces/nephews etc) and number 2. because I just haven't had the time or opportunity to take a family photo so this was the next best thing :)
I use whiteboard calendar ($2 from the cheapie shop). This size has a whiteboard at the top which is a little smaller than A4 landscape. There is also a smaller size for $1.50...more like an A5 size I guess.
This is what you will need:

paper trimmer
scissors
patterned paper (a 12x12 sheet of double sided paper is enough for one calendar)
double sided tape
coordinating ribbon, ink and embellishments
a photo or quote (I found a quote I liked, typed it in word and printed it onto some plain card)
and the calendar!
I start by cutting one piece of paper to cover the majority of the whiteboard (just leaving a thin border). My whiteboard was approx 10 1/4inch x 7 1/4 inch so I cut my paper 10 inch x 7inch. I have cut the quote down to 5 1/2inch x 3 1/2inch and from the remaining patterned paper (this is why I use double sided paper...too easy to coordinate) I cut a mat for the quote 7inch x 5inch. I also used a corner rounder on each corner of each piece.

Ink the edges of all of the paper and layer on the whiteboard using double sided tape. Punch a hole in through the paper in the top of the whiteboard (you will be able to see the existing hole from the back so I just poke a pen through the paper to make the hole. Thread some ribbon through the hole to hang the calendar from and also on the spiral section to add some more colour.

Add some embellishments to the quote. I have used some chipboard embellishments and one of Marg's beautiful doilies.

And that is it....your calendar is ready to hang :) Just like a scrapbooking layout or card the colours, subjects and embellishments are endless so no one calendar needs to look the same.
And you are done, nice and easy!
NOTES:
1. I make sure that when I am buying the calendar the printed design does not go below the top of the spiral holes. This way the patterned paper should cover the entire print on the whiteboard.
2. Instead of patterned paper you could use paint to cover the whiteboard and add your own artwork to it.
3. The little white board marker & eraser that come with these calendars is no longer needed so if your children have a whiteboard marker on their book list for next year you can tick it off baby!
4. There is plenty of patterned paper left over to punch some embellishments to use on your calendar too :)
Much love
Shannon
Friday, December 16, 2011

Monday, December 12, 2011
Back from holiday mode
A {she} state of mind is back from holidays with lots of lovelies added to our Made It online store . We are busy creating for the Handmade Expo this Saturday 17th December which will be our last market for the year. I have been so focused creating for the markets, madeit store and homespun over the last month that I haven't really let myself get into Christmas mode. But now we are back from holidays, the markets nearly wrapped up for the year and Homespun fully stocked it's beginning to look a lot like Christmas so stay tuned next week for lots of Christmas goodness <3
Friday, October 14, 2011
To market to market
Tomorrow a{she} state of mind will be at the Handmade Expo for the very first time....I'm excited!
Here is a sneak peek at just some of the products we will be selling:
5inch x 5inch canvas in various colours and lots of different quotes
(this are nice and deep so stand easily on a flat surface)

A5 fabric covers to fit visual art diaries, notebooks etc

Small canvas fridge magnets in various colours and lots of different quotes

Large doily totes

Small and Medium canvas on easel in various colours and lots of different quotes


Little owl softies, boys and girls :)

Rain is forecast for tomorrow but the markets go ahead in any weather so wish me luck!
{ shannon }
xoxox
Tuesday, September 13, 2011
Card and a half challenges
It has been a long time between posts and unfortunately it hasn't been a very nice run over the last few months but it is time to dust myself off and get on with things. So to start off, here are my cards for the current Card and a Half challenges:
Extra challenge #4

Card sketch #4

Hugs
Shannon
xoxoxo
Extra challenge #4

Card sketch #4

Hugs
Shannon
xoxoxo
Thursday, July 14, 2011
playing with tissue
I went to my first scrapbooking class in YEARS yesterday. I needed some scrapbooking mojo and this class did the trick! It was held at my local scrap shop Somewhere To Scrap and was a class covering many different uses and techniques using tissue paper. I had a play with everything in the class and then came home and played some more.
Here is a layout I did during the class using tissue paper on the layout and to cover some chipboard shapes:
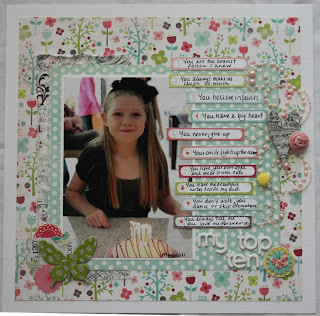
I LOVE this photo of Ellie. I think it captures her light!
With Helen's latest challenge in mind I used the scraps from the layout to create this card. Not loving the overall layout of the card but love the glimmermist over the tissue paper on the butterfly!

Many thanks to Debi at Somewhere To Scrap for such an inspirational class!
Here is a layout I did during the class using tissue paper on the layout and to cover some chipboard shapes:

I LOVE this photo of Ellie. I think it captures her light!
With Helen's latest challenge in mind I used the scraps from the layout to create this card. Not loving the overall layout of the card but love the glimmermist over the tissue paper on the butterfly!

Many thanks to Debi at Somewhere To Scrap for such an inspirational class!
Subscribe to:
Posts (Atom)